Contact Definition
Contact_Def
Overview
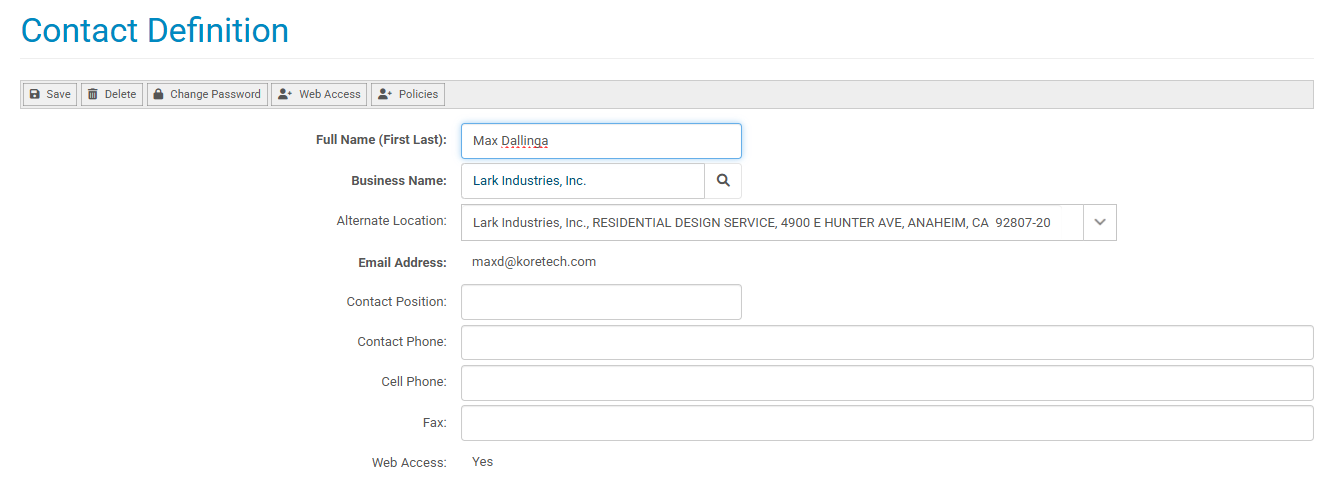
The contact definition page allows you to update information for specific contacts. From here, you are also able to change a contact's password, set policies for a contact, and navigate to a contact's User Definition page.
The image below displays what this page looks like:
Fields and Commands
The following tables detail each field and command seen in the contact definition page:
|
Field |
Description |
|
Full Name (First Last) |
The full name field indicates the name of the contact. Fill this out with first name first and last name second. A contact name is required. |
| Business Name |
The name of the business this contact is associated with. Clicking the spy glass icon in this field will bring up the Customer Search page. A client must be tied to a business. |
| Alternate Location |
This field indicates the address at which the client resides. Clicking the downward carrot icon will bring up a drop-down menu of addresses attached to this business. |
| Email Address |
You can fill in the email address of the contact in this field. A client must have an email address. |
| Contact Position | You can fill this field with the contact's job position (i.e. Senior Developer, Plant Manager, President, etc.). |
| Contact Phone | You can fill this field with the contact's primary phone number. |
| Cell Phone | You can fill this field with the contact's cell phone number. |
| Fax | You can fill this field with the contact's cell phone number |
| Web Access |
Indicates whether or not the client has Web Access. Web Access can be toggled on or off in the user definition page (accessed by the Web Access button). |
|
Command |
Description |
|
The save button saves the contact's information. If any of the required fields (Full Name, Business Name, or Email Address) are not filled, an error message will appear and you will be unable to save the contact's information until they are filled. |
|
The delete button deletes a contact from your Kore Commerce system. |
|
The web access button opens a contact's User Definition page where you can change a contact's password, give a contact web access, and set user role assignments. |
|
The policies button brings up a screen that allows you to set the policies of a contact. See the Policies Screen Fields and Commands section below for more information. |
|
|
The change password button will direct you to the Change Password Page, where you can change your personal password. The change password command will only appear on your personal Contact Definition page (the one you are logged into). |

Policies Screen Fields and Commands
The policies screen allows you to change the policies of a contact. This screen can be reached via the Policies command on the Contact Definition page. The screen will look like the image below:
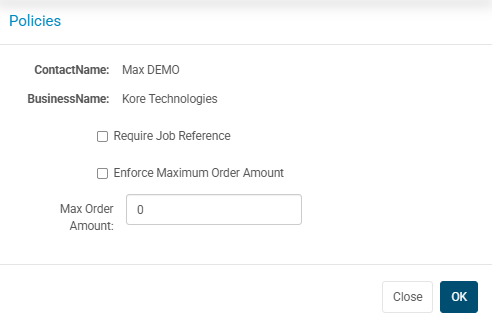
The fields and commands of the Policies screen are listed in the tables below:
| Field | Description |
| Contact Name |
The contact name field displays the name of the contact for whom you are setting policies. You cannot edit this field on the policies screen, but you can edit a contact name on the main Contact Definition Page. |
| Business Name |
The business name field displays the business associated with the selected contact. You cannot edit this field on the policies screen, but you can edit a contact's business on the main Contact Definition Page. |
|
Require Job Reference Box |
The require job reference check box allows you to enable or disable the requirement for a job reference. Selecting the checkbox will enable a job requirement for the contact. Deselecting the checkbox will remove this requirement. |
|
Enforce Maximum Order Amount Box |
The enforce maximum order amount checkbox allows you to enable or disable a maximum order amount policy for a contact. Selecting the checkbox will enable you to set a maximum order amount. Deselecting will remove this maximum order amount. |
|
Max Order Amount |
The maximum order amount field lets you to determine the maximum numerical value that a contact is allowed to order. This field will only apply this maximum amount if the Enforce Maximum Order Amount checkbox is selected. |
| Command | Description |

|
The OK button allows you to save the policies you have created or updated for a contact. |

|
The close button allows you to exit the Policies screen and return to the default Contact Definition page without saving any changes. |
Prerequisites
Related Topics